I still remember the image a friend sent to me via a FB link: a gorgeous field of green with splatters of the rainbow in every kind of color imaginable – a dream field of flowers set against a sky of calm, cerulean blue, unlike anything I'd seen in real life.
That image of layers, splatters, and blobs of colors of acrylic paint on canvas could not, would not leave my mind.
Splattering acrylic art works well because acrylic art dries fast and the paint doesn't really merge on the canvas.
Unlike watercolor, acrylic layers and sits next to other colors very nicely. Acrylic paint respects the boundaries of the other paint, while watercolor paint knows no boundaries! It merges with everything and travels where it wishes, as long as it is watery enough.
However, acrylic paint also stains everything.
Get acrylic on your clothes, the table, the floor, your skin, your hair (I've done it all!) and it is not coming out or off without a lot of scrubbing and some sort of cleaner.
While I love acrylic, it didn't really work (and often still doesn't work now) for creating in the margins of life, those times when I have fifteen or thirty minutes to create and I don't want to spend half of the time prepping!
I began to dream about creating floral art with a splatter style, but with watercolor.
I started playing and things started working!
Plus, and this was huge for me, I could create these lovely floral pieces of art without a lot of sketching! Adding color and paint is my favorite part of the process.
Being able to {mostly} skip sketching and jump right into color makes me smile!
How to Paint Flowers with a Splatter Art Style
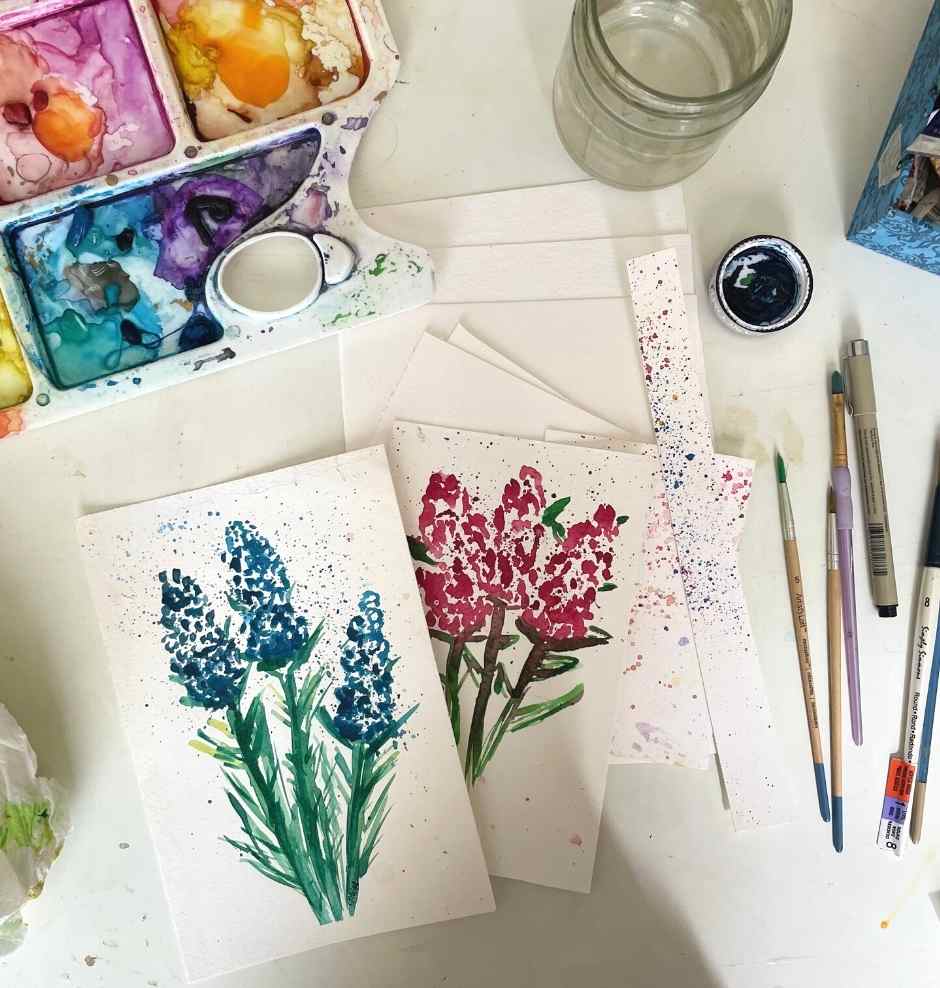
Gather your supplies: the paints, a few round brushes of various sizes (different sizes will create different size splattering), paint, clean water, and a pencil, and a micron pen (pen is optional, I use it for details).
Make sure your paper is taped down well. We are going to add a lot of wetness to the paper, and we want to do everything we can to ensure it does not buckle.
Have a few pieces of watercolor paper of various sizes to cover the parts of the painting you don't want splatters to get on.
Those splatter cover sheets will eventually be used for others splatter style art – I've found having a background of splattering makes for a fun and eye-catching canvas for the next painting!
Once you have it taped down, add any essential lines and sketching.
In the course, Paint Exuberant Flowers, the only sketching we do is to outline where the stem is and any distinctive lines for the shapes of the flowers.
For the sunflower, for example, I sketch out the face as a few of the stems.
For the lupines, I sketch out where the layers of the petals and stems are. These are guidelines, more than a detailed sketch, so I know where to splatter, especially with different colors.
It helps to either have live flowers or an image in front of you to guide you to where the colors are, how the shapes shift, and where the shadows fall.
Cover up the areas where you don't want the first layer of paint to go.
Begin to splatter the first layer of paint, coming in closer to the paper where you want the splatters to be more distinctive. Let lots of the white paper come through. We do not want a solid mass of color.
Let it dry for just a minute, then add another color of splatters. Some of that paint will merge with the first color – that is the beauty of watercolor. We want to take advantage of its magic of it without letting it merge completely.
Take the paintbrush and move the paint to create a more distinctive shape. For example, the lupines have almost circular small petals that combine to create the ascending shape. I formed the shape of the flower by shaping the splatters of paint into the shape of the flowers.
We'll come back and add more splatters later to revive the look of splattering.
Add More Layers of Splatters
I discovered I can control how abstract-y these floral paintings get. Sometimes I want more moderate splatters. When I'm in a not-so-abstract mood, I'll spend a bit more time moving the paint around to form leaves, petals, stems, and other details.
Once the initial two layers of splattering are complete, move to another part of the painting, such as the stem and any leaves.
Note: We do not want to smoosh the splatters. Instead of putting the paper cover directly over the fresh paint, I recommend placing blocks, books, or something on both sides of the painting to set the paper on top of. That way you can keep painting while it dries. Will some of the splatters creep under the space that is open? Yes, but a few splatters add to the fun!
I now move through the next part of the painting like the first, adding a layer of splatters, curving the shapes with a brush.
Now I go back to the petals and face of the flower and add more splatters, this time with a darker color. With the lupines, I may have added a bit of green into the blue to create a shadow color. Noting where the shadows are in the flower, I splatter this darker color intensely in key areas, while gently adding splatters to other lighter areas.
When Do You Stop Splattering?
Great question.
I have found that two layers of splatters looks unfinished, but five or six layers gets to be a bit messy. Colors merge and the painting loses the fresh look I want.
Somewhere between three and four layers of splatters seems to give me the best result, but it is a bit of an experiment.
I recommend using round tip paintbrushes in sizes two, four, and six to allow the colors the maximum ability to dry next to each other and get the sense of dancing together.
Once you think you have your final layer, let it completely dry.
Once the painting is completely dry, add in the final details.
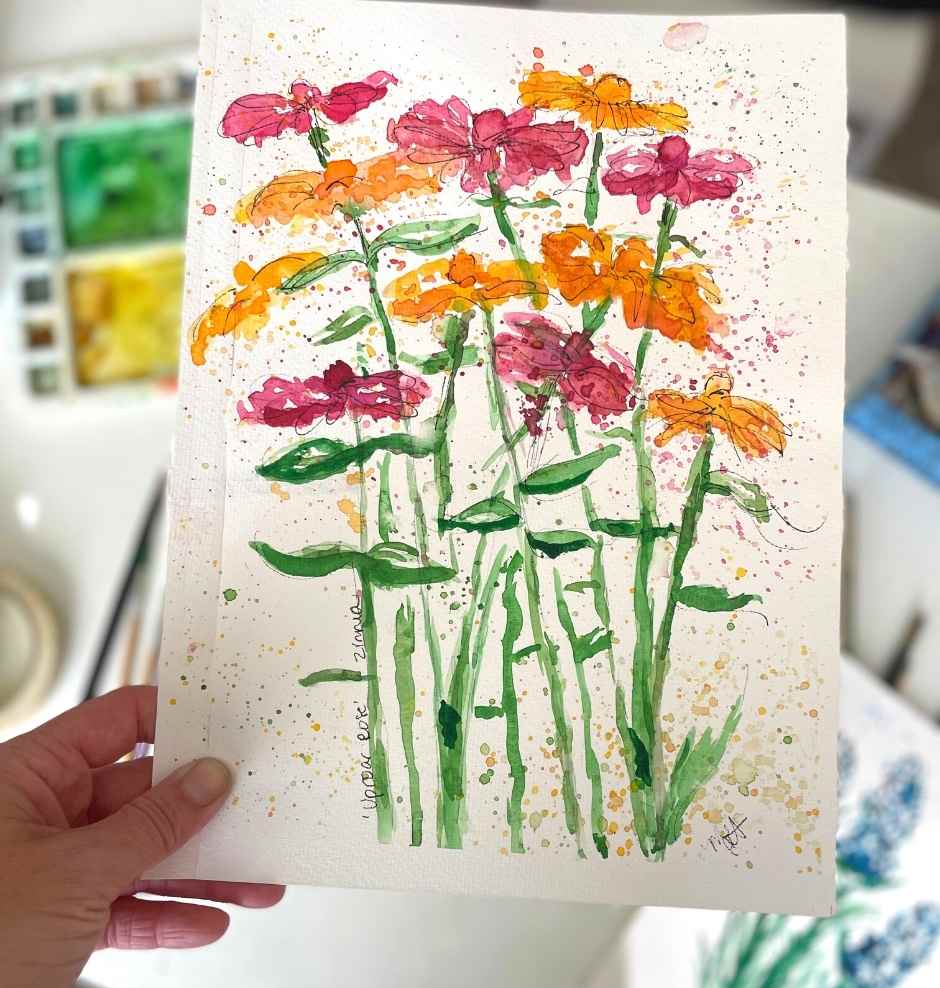
That might be a bit of pen work with a micron pen like in this painting of a bouquet of zinnias.
Typically, I add some splatters around the flowers, using the colors of the stems to create a bit of contrast and draw the eye around the painting.
Have fun playing and experimenting! These paintings are fun and fast to create. Even the first one can turn out very nicely, but once you do a few, there is a rhythm you'll get into! I started getting all sorts of ideas for how to incorporate splatter-style painting with all sorts of flowers.
Enjoy! If you have questions, you can find me on Instagram or email
[email protected]
Interested in purchasing the Splatter Art Floral Course? Read more (and purchase)
here!


.jpg)